Somewhere in your browser history there is a toilet you almost bought. Before you finish that order, get a tape measure and spend four minutes on the floor of your bathroom. The number you need is called the rough in, and it is the only specification that decides whether the box on your porch becomes a working toilet or a return label.
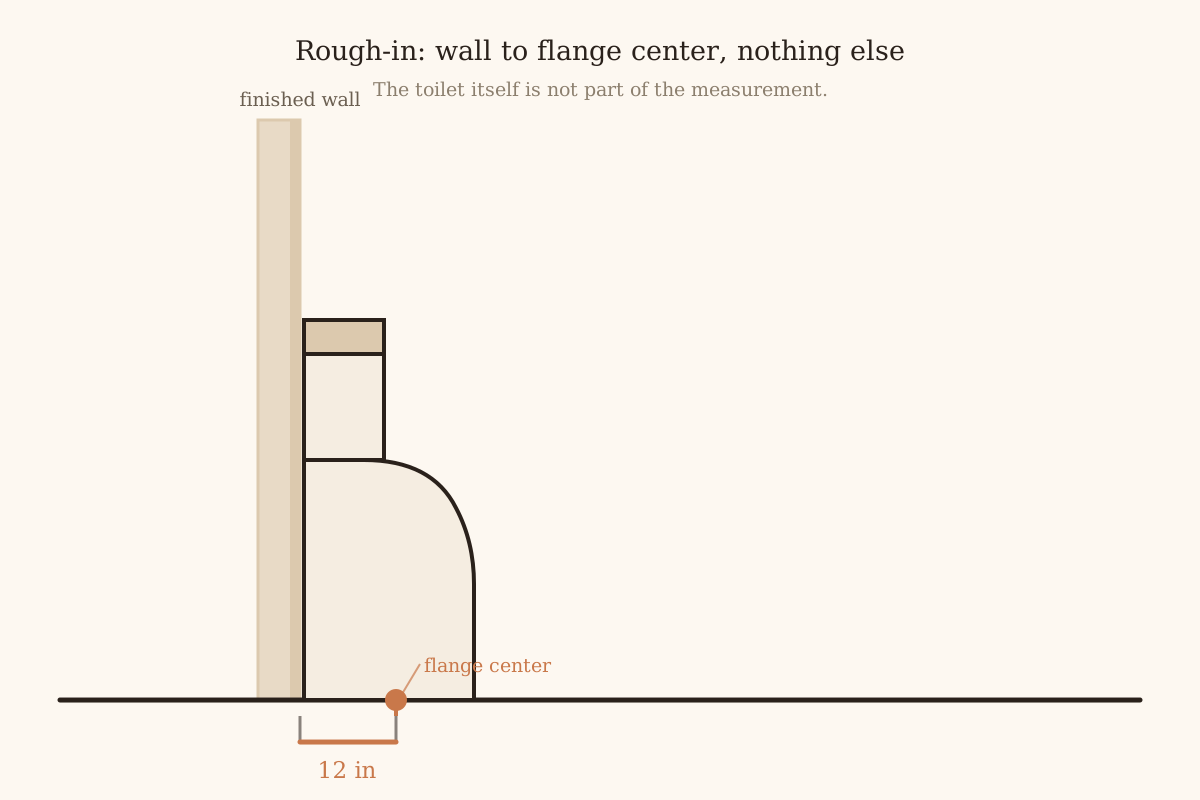
The short version: rough in is the distance from the finished wall behind the toilet to the center of the closet flange. American toilets are sold in three sizes: 10, 12, and 14 inches. And of the ways to get the number wrong, only one leaves you holding a toilet that will not go in.
The number you need isn’t on the box
The carton will tell you the toilet’s rough in. Twelve inches, most likely. What the carton cannot tell you is the rough in of the room the toilet is going into, and that is the number that has to match.
Ask a salesperson and you’ll hear that 12 inches is standard. That is true, and it is unhelpful in the way that “most people wear a medium” is unhelpful when you are holding a large. Twelve inches is the most common rough in you will find in an American home, by a wide margin — you will see the words majority and overwhelming standard in manufacturer and retailer guides — but 10 inch rough ins turn up regularly in older houses, small baths, and half baths. Fourteen inch ones appear where somebody furred out a wall to make room for plumbing. Plumbers who work on 1920s housing will tell you they expect 14 inches in those walls, though that is a rule of thumb from the trade and not something I could find documented anywhere official.
Nobody publishes the actual split between the three. If a page hands you a percentage, that page made it up.
The wall you measured isn’t there yet
Rough in runs from the finished wall: the surface the tile or the paint sits on. Studs, bare drywall, and the green board still leaning in the garage all belong to an earlier stage of the job, and every manufacturer uses that finished plane as its datum line.
Kohler draws it on their spec sheets and labels the line Finished Wall, with Finished Floor below it. American Standard puts it in a sentence: the distance from wall to closet flange centerline must match the dimension on their chart under ROUGH-IN DIMENSION “A,” and that chart lists 10” (254 mm), 12” (305 mm), and 14” (356 mm). TOTO’s language is plainest of all, telling you to mount the floor flange at a nominal 12” rough-in distance. Three companies, one imaginary plane.
If your bathroom is down to studs, that plane is the thickness of everything you have not hung yet.
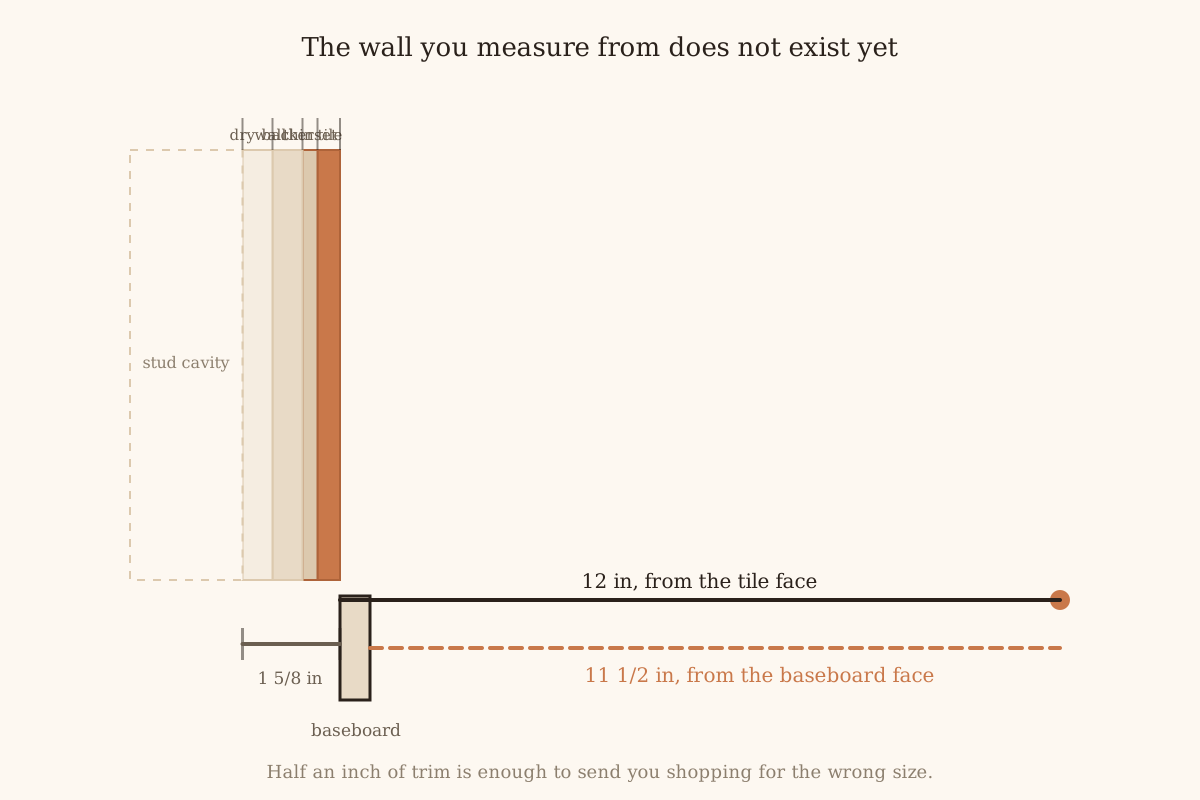
So here is the stack-up in a tiled bath, and I want to flag that this arithmetic is mine. I added the layers; no manufacturer handed me the total. Three eighths for the tile and an eighth to a quarter for thin-set are the easy part. The substrate under them is where the range opens: a half inch of cement board hung straight on the studs is the thin case, and the same board over a layer of drywall is the thick one. That lands somewhere between an inch and an inch and five eighths in front of the wall you are looking at, so a rough in taken against bare studs reads too big by that much. Take the thicker end off a wall built to the thinner one and you end up five eighths of an inch short, which is enough to push a reading of twelve down into a ten.
Baseboard is where the measurement goes wrong
Most people never measure to the wall. They measure to the baseboard, because the baseboard is what the tape hits first. One plumbing guide says it outright — measure to the wall, not the baseboard — and notes that the baseboard is typically 1/2 to 3/4 inch thick. Another puts a number on the damage: a baseboard can throw the reading off by around half an inch, enough to make a 12 inch rough in read as 11 1/2 and send you shopping for the wrong toilet.
Eleven and a half inches is the most dangerous number in this job, because it doesn’t look like any of the three sizes. It looks like something you should round, and whether you should depends on what your tape was touching when it stopped.
Measuring with the toilet still bolted down
If the old toilet is in place, you cannot see the flange, and you should not pull it just to look. Measure from the finished wall to the center of the base bolt caps — the little decorative covers over the closet bolts. If there are two bolts on each side of the base, use the rear pair; on some two-bolt designs the front pair sits ahead of the flange center and will read long.
If the toilet is already out, skip the proxy and measure straight to the center of the closet flange, the metal or plastic ring set into the floor that the wax ring sits on. Measure to the geometric center of that ring. Bolt slots are elongated, and measuring to the front edge of a slot can cost you a quarter inch for no reason.
There is one case where the bolt-cap method simply fails. A skirted toilet wraps its base in smooth ceramic, hiding the bolts completely. If that is what is on your floor, the surface you can reach does not expose the flange center, and the only honest move is to lift the toilet or measure to the flange itself. Skirted toilets are also where people most often estimate and hope.
The arithmetic: one direction fits, one doesn’t
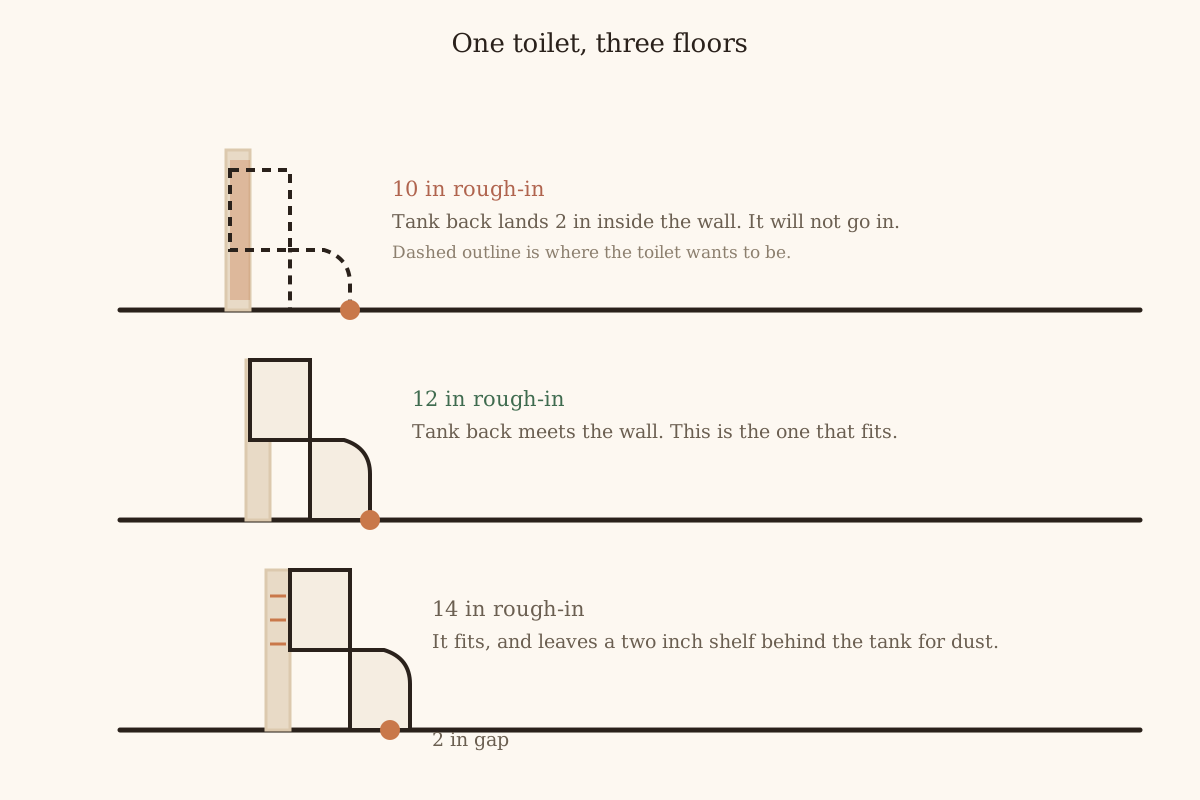
A toilet’s rough in dimension is the distance from its finished back to the center of its outlet. A 12 inch toilet wants 12 inches of floor between wall and flange center. A 10 inch toilet wants 10. Line the three cases up and the asymmetry appears.
Your flange sits at 14 inches. You buy a 12 inch toilet. The toilet needs 12, the floor offers 14, and the leftover 2 inches becomes a gap between the tank and the wall. Visible, slightly ugly, completely functional.
Your flange sits at 12 inches and you buy a 10 inch toilet. Same 2 inch gap, same result. The toilet works.
Now your flange sits at 10 inches and you buy a 12 inch toilet. The toilet needs 12 and the floor has 10, so the back of the tank ends up 2 inches inside the drywall. There is no gap to fill and nothing to shim. You are holding a toilet that does not fit the hole.
The rule that falls out of this is directional: the toilet’s nominal rough in has to be no bigger than the number you measured. Buy smaller and you inherit a gap. Buy bigger and you inherit a box.
When two guides disagree, take the lower number
Two reputable guides give opposite instructions.
Easy Plumbing’s guide tells you to round your measurement to the nearest of the three sizes — 10, 12, or 14. Premier Bidets’ guide tells you to always round down, on the grounds that a toilet too big will not install.
On most readings the two rules agree. On 11 1/2 inches they don’t. Round to nearest and you buy a 12. Round down and you buy a 10.
Rounding down bets on the cheaper mistake, because the two are not equally priced. Round down wrongly and you own a toilet with a 2 inch gap behind the tank that nobody will notice except you, and which a bead of caulk will quiet if it bothers you. Round up wrongly and you own a toilet that has to go back in its box, plus a second trip, plus whatever the return policy charges. One error is cosmetic. The other is a wasted Saturday.
So the baseboard reading from earlier needs a correction. If your tape says 11 1/2 and the baseboard is 3/4 inch thick, the wall is at 12 1/4. The baseboard ate the difference, and the right answer there is a 12 inch toilet, not a 10.
Two steps, in this order: get the tape to the finished wall, then round down. Skip the first and the second cannot save you.
What the flange actually has to do
While you are down there with the tape, look at the flange, because a perfect rough in on a bad flange still leaks.
Oatey, which manufactures them, states the ideal plainly: the flange should sit on top of the finished floor for optimal performance. On the same page they allow for reality — if the flange is flush with or slightly below the floor, use a thicker wax ring or flange spacers to compensate. And they describe the failure when you don’t: a flange sunk below the finished floor prevents proper wax ring compression and causes leaks.
Worth saying clearly, because it gets repeated as gospel: this is manufacturer guidance and trade practice. IPC 405.3 and 405.4.2, the sections governing water closet flanges, ask for three things: a thickness minimum on the flange itself, fastening to the structure with corrosion-resistant screws, and a connection to the drain. Nothing about sitting flush with finished flooring. That line lives in manufacturer literature.
If your flange is off sideways rather than vertically, an offset flange can shift the drain by up to 2 inches in any direction. It is the fix for a drain that is off by an inch or two — common on 10 inch and 14 inch rough ins. It also slightly restricts the waste path, which is why it is best left to a plumber.
Seat height is a different number, measured somewhere else
Rough in gets you a toilet that fits the floor. It says nothing about whether the toilet fits you, and that second number has its own trap.
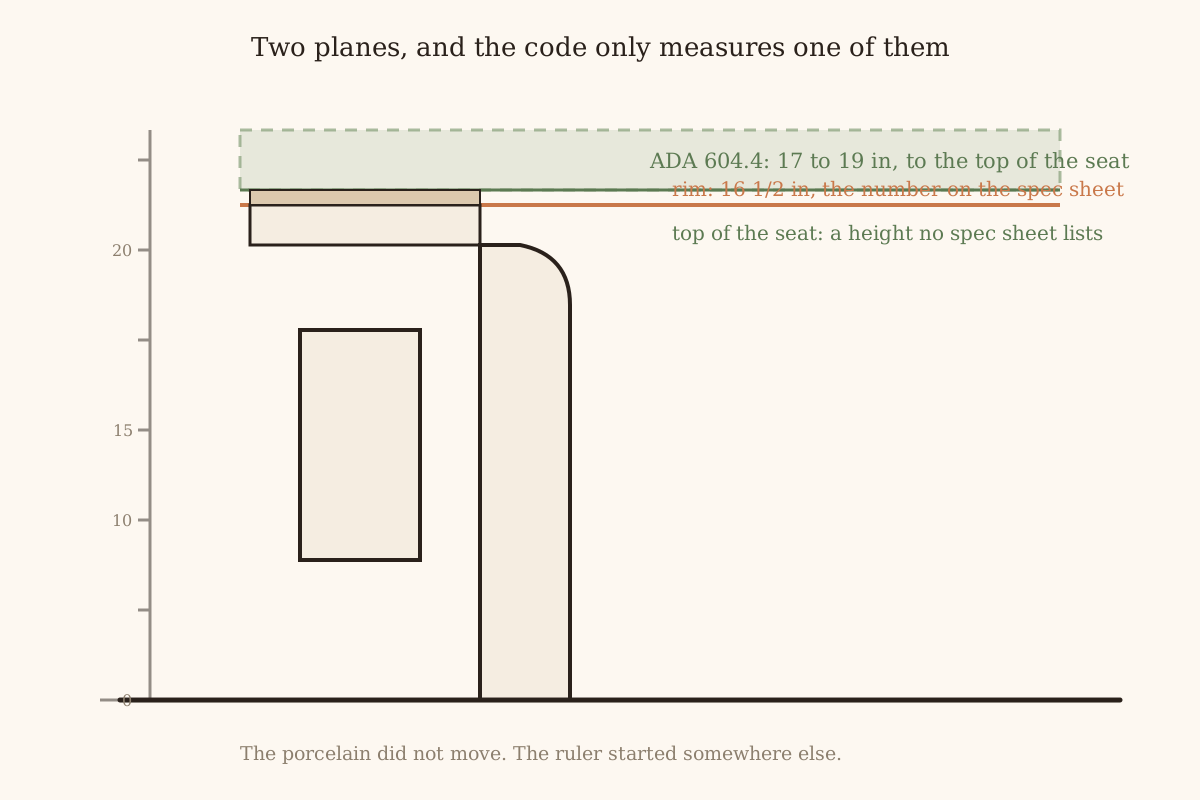
ADA 604.4 sets accessible seat height at 17 to 19 inches, measured to the top of the seat. Top of the seat. The rim of the bowl is lower, and how much lower depends on the seat you choose.
Manufacturer specs do not always measure there. Kohler’s Comfort Height toilets are listed at 16 1/2 inches; TOTO’s Universal Height models at 16 1/8. Both figures are taken at the ceramic rim, before any seat goes on. The seat then adds a thickness that appears on no spec sheet I could find, and that thickness is the whole difference between the rim height and the seat height. That also explains the careful qualifier Kohler attaches to those listings: the height holds only when the toilet is installed to the specific requirements of those regulations.
So do not compare a rim figure with a seat figure. They sit on different planes, one seat apart, and no conversion factor gets you from one to the other without knowing the seat you will actually install. If accessible height matters in your house, put the tape on the top of the seat of the toilet you already own rather than on its rim, and work from that number.
The clearances nobody checks until the door won’t close
The last set of numbers gets discovered too late. IPC 405.3.1 asks for at least 15 inches from the toilet centerline to a side wall, at least 30 inches center to center between adjacent fixtures, and at least 21 inches of clear space in front of the bowl.
Then there is the toilet’s own footprint. A round front bowl runs about 25 1/2 inches out from the wall; an elongated bowl runs about 28 1/2. In a tight bathroom that 3 inches decides whether the door closes. It also decides whether your rough in is even the number that matters, since a 10 inch rough in pulls the whole fixture closer to the wall and buys back depth in a narrow room.
Measure the room’s depth as well, wall to door, before you get attached to an elongated bowl.
Go put a tape on it. Finished wall to the bolt caps or the flange center, baseboard thickness written on the same scrap of paper so you don’t round the wrong number later. Then look at how high the flange sits while you are kneeling there. Write down the size your paper says, and order that one.